
5 essential Photoshop tools you need to turn your drawing into a beautiful art print
As a self-taught artist, I’ve picked up most the skills I need for things like Photoshop as I’ve gone along. A Google here, a few Youtube videos there. Some notes scrawled on a scrap of paper or tucked away in a file on my computer (where I forget that I’ve put them), but I can usually figure out how to do what I need to do.
And one thing I’ve learned is that for anything you need to do with your artwork in Photoshop, you’ll probably discover there are at least twelve different ways to do the same thing. Eventually, you stumble upon the ways to use Photoshop that work best for you and stick with them. At some point, most of the things you do regularly become second nature, and you forget how you learned them.
It’s easy to assume that everyone else knows what they’re doing when they’re editing their work digitally. But I was talking to a friend and fellow artist recently who wanted to know how I made my greeting cards, and I was reminded that isn’t necessarily the case.
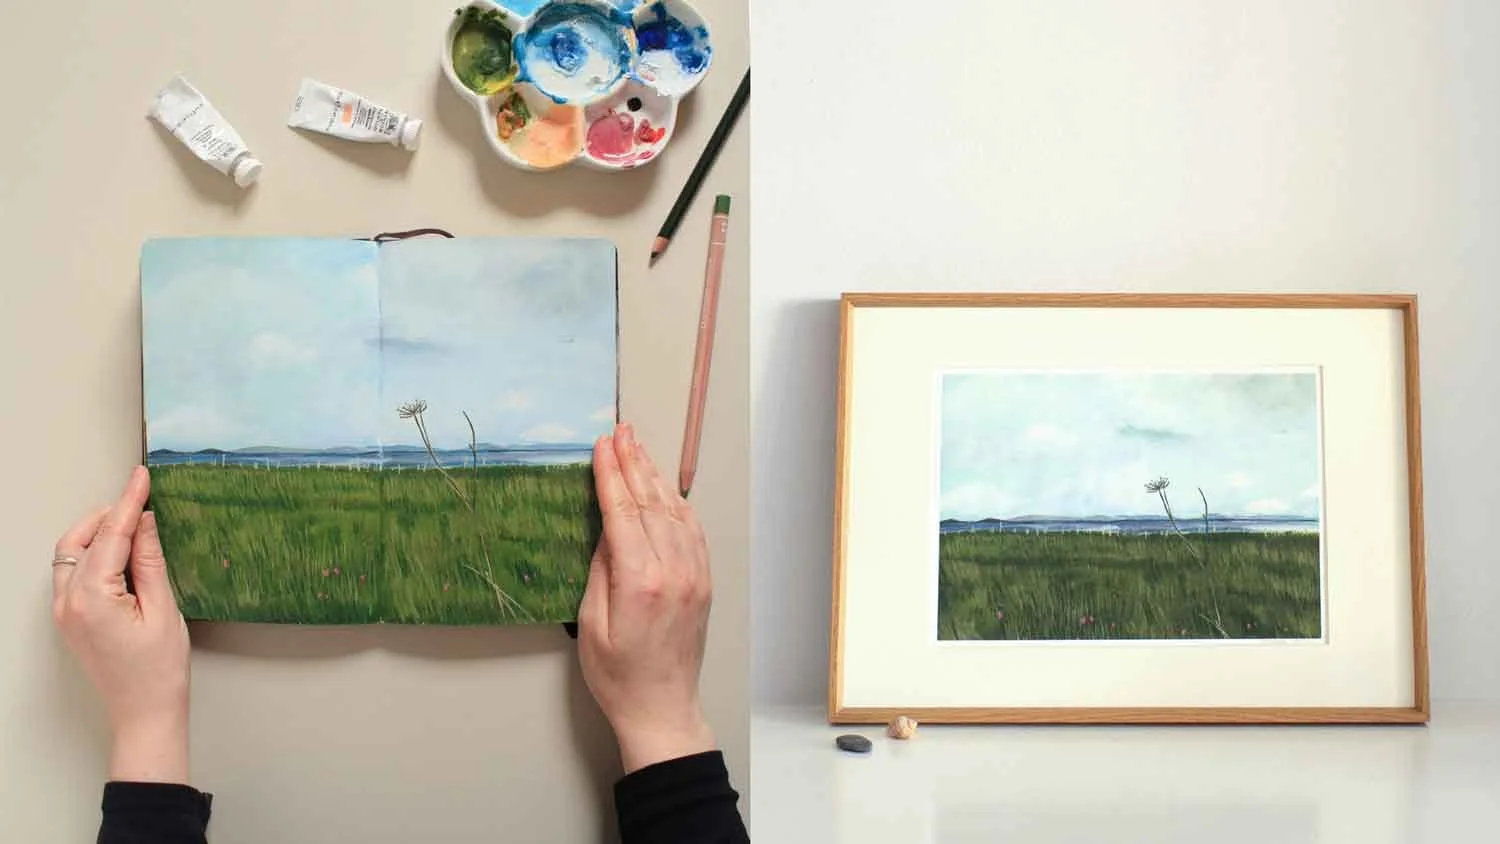
So today I’m sharing the essential tools I use in Photoshop to turn a sketchbook drawing into an art print, or at least a file ready for a printing company to do that for you.
I use 5 main Photoshop tools for this (plus a few others but we’ll stick to the basics here). Before we get to them, though, you’ll need to scan your sketchbook page/drawing so that it’s on your computer, and make sure it’s in the right ‘mode’.
What on earth is a DPI?
DPI stands for 'dots per inch', and the more dots (tiny bits of the image) there are per square inch of the screen, the higher the resolution, which basically means you can increase the size without it getting all fuzzy, and you'll get a higher quality print in the end. Most printing companies will tell you their minimum dpi requirements, so check that before you start scanning.
So the rule is: higher DPI = better quality print. You need to scan at a minimum of 300 dpi - never go below this for printing. I usually scan at 600 dpi.
Make sure the image mode is correct
Once you've got your scan, it's time to open it up in Photoshop and make sure you're using the correct image mode. There are two modes to choose from: RGB is for images that will be displayed on screen (like on your website or social media) and stands for Red, Green and Blue. CMYK is the format most printing companies require and stands for Cyan, Magenta, Yellow and Key (which is black).
We don’t need to worry too much about what all of this means but basically, it’s to do with the colours used to create an image either on a screen or in print and they’re different in each case. If you print an RGB image the colours won’t look right. Just make sure for print to use CMYK, unless your printing company specifically tells you not to (sometimes they’ll change that setting for you). To check/change this, go to Image > Mode > CMYK

Change the image mode to CMYK for printing
Now we get to the tools you need to get your scanned image looking just right and ready to print.
1. Rotate your image
If your scan is sideways or upside down, go to Image > Image rotation and select which way and how much you want to rotate the scanned image.

Rotate the image
2. Crop
Hit 'C' to bring up the crop tool, or go to the toolbar on the left of your screen, and you'll find it there - it's the one that looks like two right angles intersecting.
If your scanned image is on a white background, try to crop it as closely as possible to remove as much of the background as you can without cutting off any of your drawing.
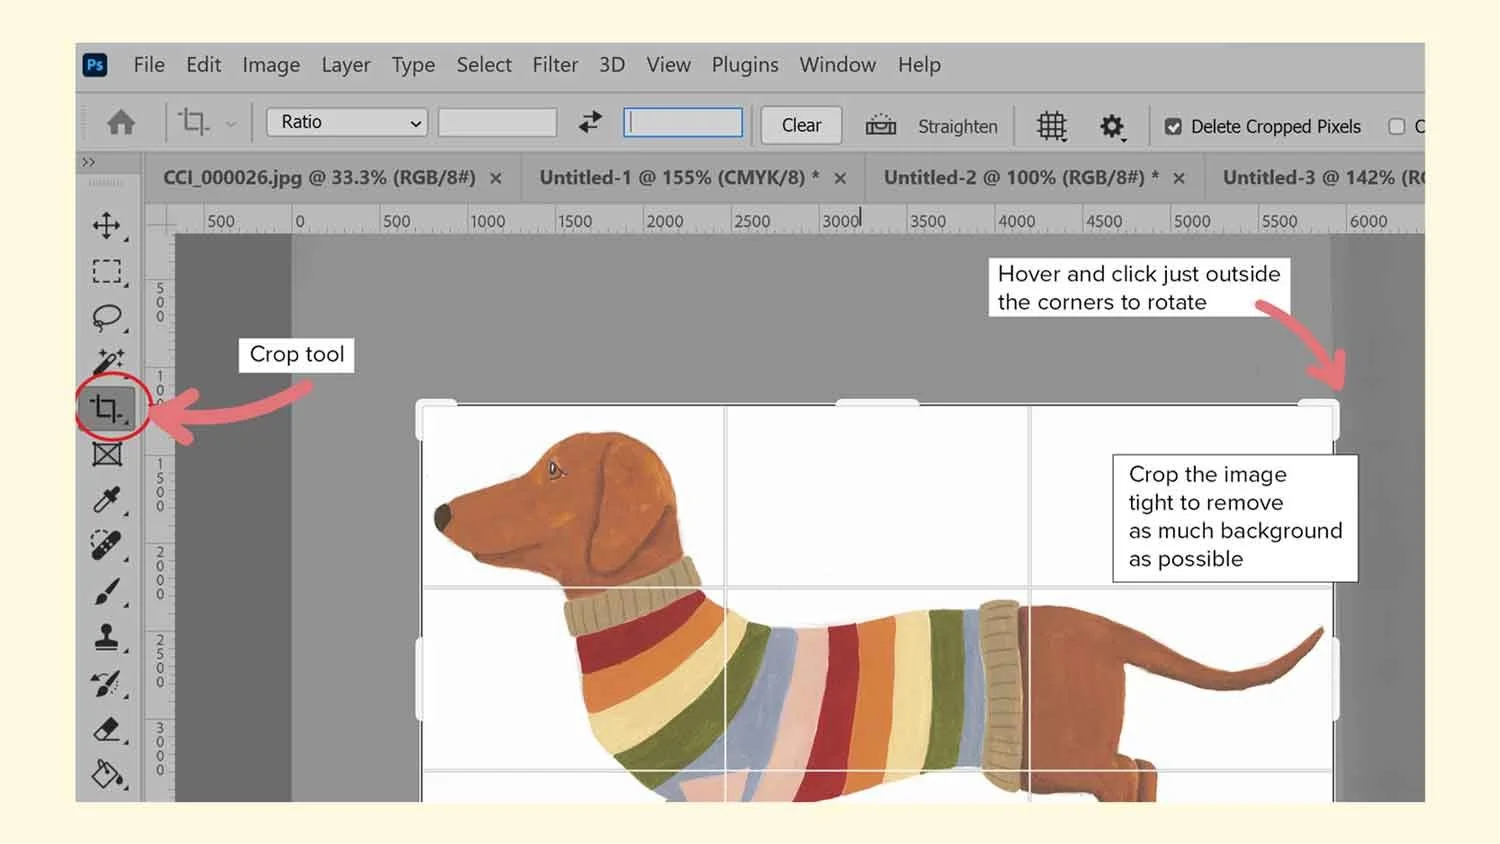
Cropping an image
If the artwork covers the whole page just crop it to remove any bits that the scanner picked up around your sketchbook/paper and a little extra to remove the curved corners of the pages if necessary.
While you're using the crop tool you can also rotate the image from just outside the corners if it's not quite straight.
3. Levels
The Levels tool in Photoshop balances the tones in an image out by making sure the black, white and grey tones are correct. his affects how all your other colours will appear too so it’s important.
Hit Ctrl + L or Cmd + L on a Mac, or go to Image > adjustments > levels
This opens the Levels panel where you'll see some slider controls and eye droppers.
You can just hit 'auto' and see what the result looks like but if it's not good (and usually I find it's not good), hit Ctrl/Cmd + Z to undo and use the sliders.
Drag the right-hand slider towards the centre to lighten the image, the left hand slider will make any dark areas darker and the middle slider will help you adjust the greys and mid tones. If you've got a nice scan you probably won't need to make any huge adjustments here. So when the colours look good, click OK.

Levels adjustment
4. Remove the white background
Unless your image takes up the entire page with no white paper showing, you will need to remove the white background. This is true even if you plan to have a white background on your finished print to make sure it's nice and clean.
There are lots of different ways of removing the white background and removing the background on a black line drawing is a bit more complex so maybe I'll go through that in a separate post sometime. But for a full colour image with the white page surrounding it, the easiest tool to use is the magic wand.
Just select the magic wand tool by hitting ‘W’ on your keyboard or selecting the tool that looks like a magician’s wand in the toolbar. Then click on the white background. This should select all the background and what you’ve selected will be surrounded by a moving dotted line (or ‘marching ants’). You can add to that selection or repeat the process later if some of the background gets left behind.

The ‘marching ants’ show the area you’ve selected ready to be removed
Then in the layers panel, double-click the background layer. This will turn it into a 'normal' layer. Hit the delete key and the white background will be gone. You might need to tidy up the edges of your drawing at this point and you can use the eraser tool for this (hit 'E' on your keyboard or in the lefthand toolbar look for the rectangle that's half black, half grey).
Then, if your background layer isn’t the colour you want in your final print, you can change that now.
5. Clone stamp tool
If you're working with a drawing or illustration that you created across a double page in your sketchbook you are going to have to deal with the 'gutter' where the 2 pages meet. You don't want that on your final print so in my opinion the best tool for this is the clone stamp tool. Inthe toolbar, the clone stamp looks like a rubber stamp.
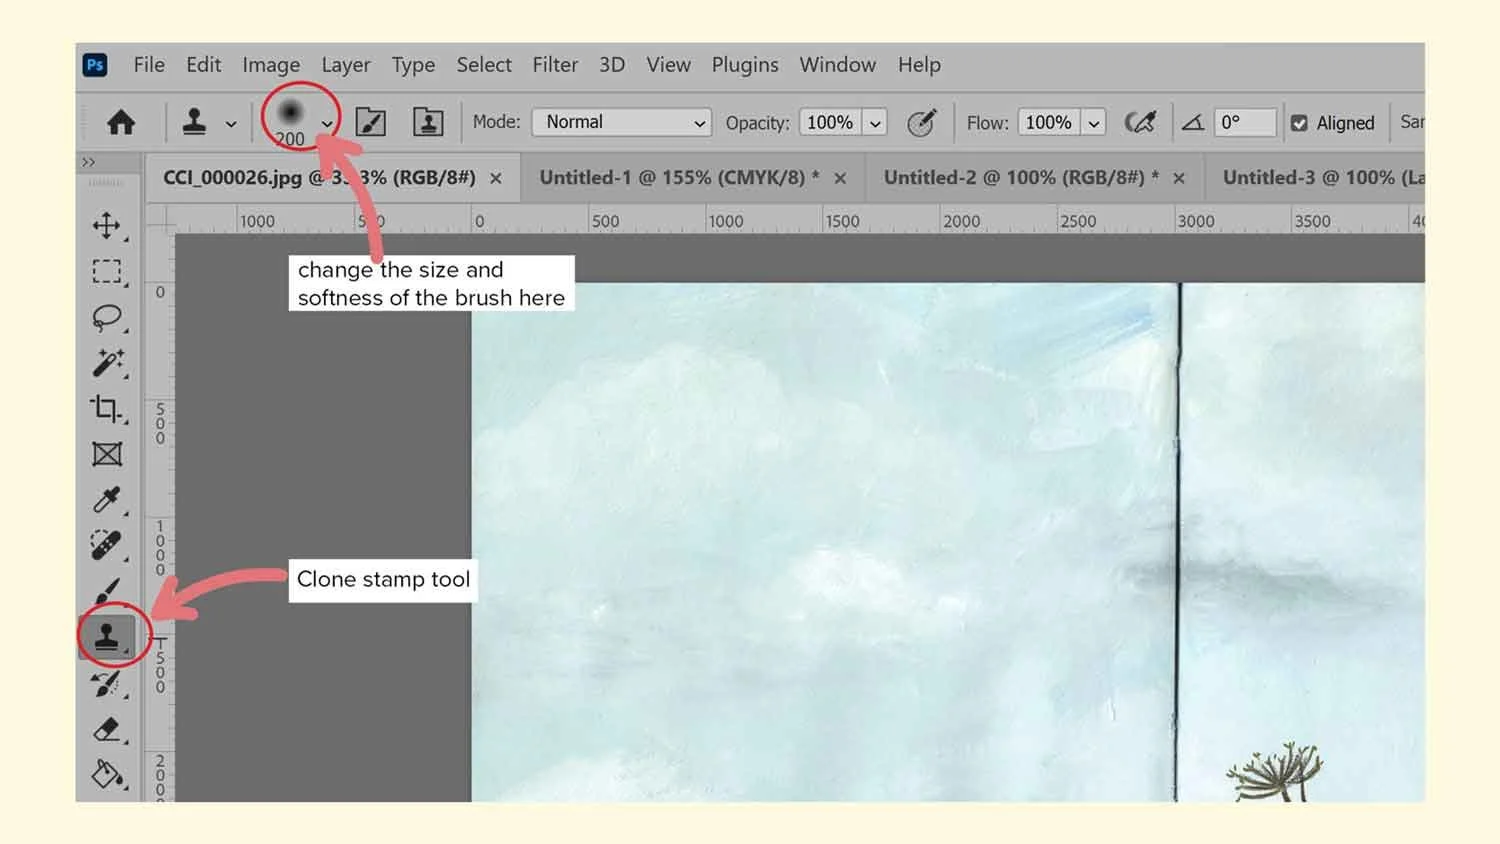
Clone tool
With the clone stamp, you're essentially copying (or ‘cloning’) a small section from one part of your image and pasting it somewhere else in the same image to cover something up. So for this painting, I used the clone stamp to copy other areas of the sky and grass and stamp/paste them over that annoying seam down the middle of the screen.
Hold down the ‘alt’ key (or Option key on a Mac) as you click to select the area you want to clone and then click without holding down the ‘alt’/’option’ key to paste that clone section over the middle of the image.
I'd recommend making the edges of the brush/stamp soft and varying where you copy from as much as possible, otherwise you risk the middle part of your image looking obviously patched together.
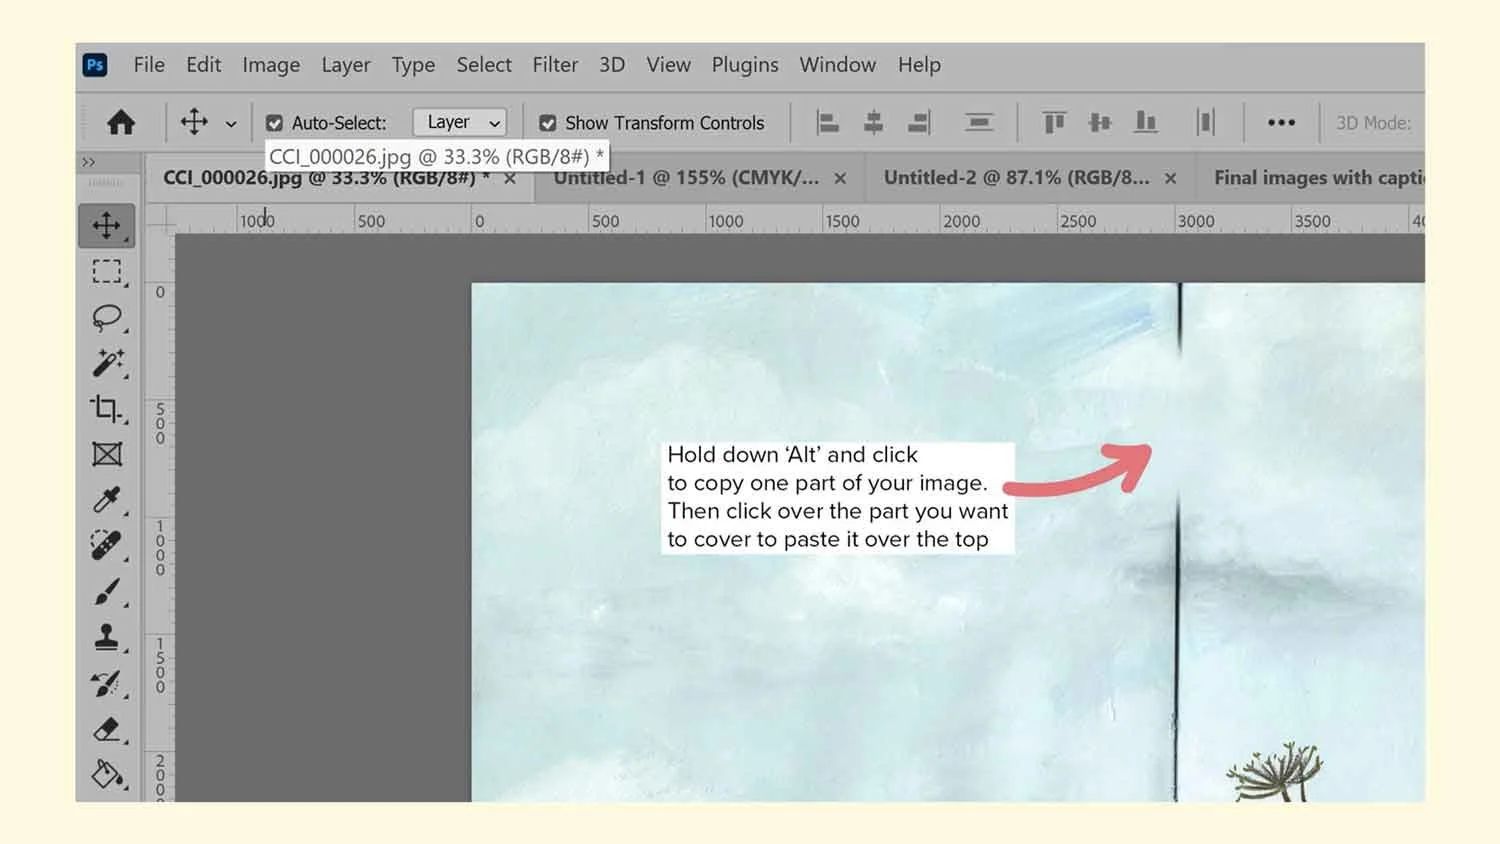
Hold down the ‘alt’ key to use the clone tool
So they are the 5 main tools I use to transform a sketchbook drawing/painting into a file ready to print and frame. There’s a lot more detail I could go into about removing the white background, cleaning up your image and a few other bits and bobs but I’ll save that for another day.
Before I leave you. I’ll share one bonus tool with you.
6. Hue/Saturation
If the levels tool didn’t get your colours looking quite right, you may also want to try the Hue/Saturation tool.
You can find this in Image > Adjustments > Hue/Saturation or by hitting Ctrl/Cmd + U on your keyboard. Now you can play around with the 3 sliders for hue, saturation and lightness to tweak your image a little bit more.

Hue/saturation
That should leave you with a lovely print-ready file. Make sure you check your print company’s exact requirements before you send it away (they may want a JPEG, PDF or PSD file) and let me know in the comments if you have any questions or if I’ve missed something.
More like this, plus 10% off and a freebie
Sign up for 10% off your next purchase, new artwork, product releases, promotions, inspiration and updates from Cathryn's blog. Plus a free printable zine full of drawing prompts.